網頁

2012年4月7日 星期六

Column Width of easyui DataGrid

Last Update: 2012/04/07 18:39+08


Intro

target: jQuery EasyUI DataGrid 的 Column 自適應寬度
如果您沒有指定寬度給 Grid 的 Columns
在載完資料後, 您會發現 Header 和 Body 的欄寬沒有對齊
主要是因為它產生的 Header 和 Body 是在不同的 table


Content

在 DataGrid 的 onLoadSuccess 的事件中加入一些代碼, 如下:
onLoadSuccess: function (data) {
    var panel = $(this).closest(".datagrid");
    var dg = $(this);
    panel.find("div.datagrid-view2 > div.datagrid-body tr:first > td[field]").each(function (k, v) {
        var bodyCol = $(v);
        var field = bodyCol.attr("field");
        var headerCol = panel.find("div.datagrid-view2 > div.datagrid-header tr:first > td[field='" + field + "']");
        var bodyContent = bodyCol.children(":first");
        var headerContent = headerCol.children(":first");
        var content = null;
        if (bodyCol.width() > headerCol.width()) {
            content = bodyCol.children(":first");
        } else {
            content = headerCol.children(":first");
        }

        var col = dg.datagrid("getColumnOption", field);
        col.width = content.outerWidth();
        col.boxWidth = $.boxModel == true ? content.width() : content.outerWidth();

        bodyContent.width(col.boxWidth);
        headerContent.width(col.boxWidth);
    });
    dg.datagrid("fitColumns");
    dg.datagrid("fixColumnSize");
}

B.R. : )

2012年4月2日 星期一

WCF Inspector

Last Update: 2012/04/03 00:14
Type: Normal

Intro

目標: 攔截 Client 與 WCF 的溝通訊息

Content


.. 專案建置(可跳過)
... 輸入WCF專案名稱(TestWcf)
請毫不猶豫的按下新增後, 完成 Server!!
就用他預設的Sample Code就好

... 啟動 WCF(Web Service)
在專案上按右鍵 => 偵錯 => 開始新執行個體
找到你的 wsdl 的 uri (ex: http://localhost:1101/Service1.svc?wsdl)

.. 新增Client專案
這裡用 Web Site (TestWeb)
對專案點右鍵 => 加入服務參考 => 輸入 wsdl 的 uri => 確定


===我不是分隔線========================
這東西講起來
就是用 MS 架構好的 Inspector
所以說明起來沒啥意義
直接 2 步驟 完成它!!!

.. step1建立攔截處理器
在 TestWeb 新增下述 class
using System;
using System.Collections.Generic;
using System.Linq;
using System.Web;

namespace TestWeb
{
    public class MyWcfMessageInspector : System.ServiceModel.Configuration.BehaviorExtensionElement,
        System.ServiceModel.Dispatcher.IClientMessageInspector,
        //System.ServiceModel.Dispatcher.IDispatchMessageInspector,
        System.ServiceModel.Description.IEndpointBehavior
    {
        protected override object CreateBehavior() { return new MyWcfMessageInspector(); }
        public override Type BehaviorType { get { return typeof(MyWcfMessageInspector); } }


        #region IClientMessageInspector
        public void AfterReceiveReply(ref System.ServiceModel.Channels.Message reply, object correlationState)
        { System.Diagnostics.Debug.WriteLine("===AfterReceiveReply"); }
        public object BeforeSendRequest(ref System.ServiceModel.Channels.Message request, System.ServiceModel.IClientChannel channel)
        { System.Diagnostics.Debug.WriteLine("===BeforeSendRequest"); return null; }
        #endregion

        //#region IDispatchMessageInspector
        //public object AfterReceiveRequest(ref System.ServiceModel.Channels.Message request, System.ServiceModel.IClientChannel channel, System.ServiceModel.InstanceContext instanceContext) { throw new NotImplementedException(); }
        //public void BeforeSendReply(ref System.ServiceModel.Channels.Message reply, object correlationState) { throw new NotImplementedException(); }
        //#endregion

        #region IClientMessageInspector
        public void AddBindingParameters(System.ServiceModel.Description.ServiceEndpoint endpoint, System.ServiceModel.Channels.BindingParameterCollection bindingParameters) { }

        public void ApplyClientBehavior(System.ServiceModel.Description.ServiceEndpoint endpoint, System.ServiceModel.Dispatcher.ClientRuntime clientRuntime)
        {
            clientRuntime.MessageInspectors.Add(new MyWcfMessageInspector());
        }
        public void ApplyDispatchBehavior(System.ServiceModel.Description.ServiceEndpoint endpoint, System.ServiceModel.Dispatcher.EndpointDispatcher endpointDispatcher) { throw new NotImplementedException(); }
        public void Validate(System.ServiceModel.Description.ServiceEndpoint endpoint) { }
        #endregion

    }
}
BehaviorExtensionElement: 為了在 web.config 裡設定
IClientMessageInspector: Client端的訊息攔截
IEndpointBehavior: 設定此class的行為是Endpoint


.. step2 設定 web.config
加入下述設定, 用來建立攔截器
<system.serviceModel>
  ...
  <extensions>
    <behaviorExtensions>
      <add name="MyWcfMessageInspector" type="TestWeb.MyWcfMessageInspector, TestWeb, Version=1.0.0.0, Culture=neutral, PublicKeyToken=null"/>
    </behaviorExtensions>
  </extensions>
  <behaviors>
    <endpointBehaviors>
      <behavior name="MyWcfMessageInspectorBehavior">
        <MyWcfMessageInspector />
      </behavior>
    </endpointBehaviors>
  </behaviors>
  ...
</system.serviceModel>

在你欲攔截的 Endpoint 設定中
加入 behaviorConfiguration="MyWcfMessageInspectorBehavior"
<system.serviceModel>
  ...
  <client>
    <endpoint ... behaviorConfiguration="MyWcfMessageInspectorBehavior" />
  </client>
  ...
</system.serviceModel>
OK 大功告成

2012年3月31日 星期六

Web Service - Axis2

Last Update: 2012/04/01 07:28+08
Type: Normal

Intro

target 是在 用 Axis2 建立 Web Service 及其 Client


環境:
jdk-1.7.0.3
Axis2-1.6.1
eclipse-jee-indigo-SR2-win32
JBoss 7.1 (not important, you can use tomcat)

P.S. 若用 JBoss 7.1
downlaod 官網的 JBoss Server 後
請先用 eclipse market 找 JBoss 然後安裝適合你的(eclipse)版本
不然會找不到 7.1 的 Server


Content


.. 安裝必要 Component
(路徑自選)
安裝 jdk 到 C:\Program Files\Java\jdk1.7.0_03
解壓縮 eclipse, JBoss and Axi2 到 D:\ProgramData
啟動eclipse~

.. 安裝JBoss plugin 用以支援6.0以上
(選單)Help => Eclipse Marketplace => 搜尋 JBoss 並安裝

咱的eclipse版本是 Indigo(3.7), 所以 JBoss plugin tool 是 3.3
在 Marketplace 選擇有標記 Indigo 的

JBoss 官網 Download


.. 設定執行環境 - JDK
(選單) Window => Preferences => Java => Complier => Compiler compliiance leve: 1.7(自選)

(選單) Window => Preferences => Java => Installed JREs => 新增JDK 1.7 (自選- C:\Program Files\Java\jdk1.7.0_01)

.. 設定執行環境 - JBoss
(選單) Window => Preferences => Sreve => Runtime Environments
=> 新增 JBoss 7.1 (自選- D:\ProgramData\jboss-as-7.1.1.Final)

.. 設定執行環境 - Axis2
(選單) Window => Preferences => Web Services => Axis2 Preferences
=> 在 [Axis2 runtime location] 設定 Axis2 路徑(自選- D:\ProgramData\axis2-1.6.1)

.. 建立 Web Service
---Create Project---
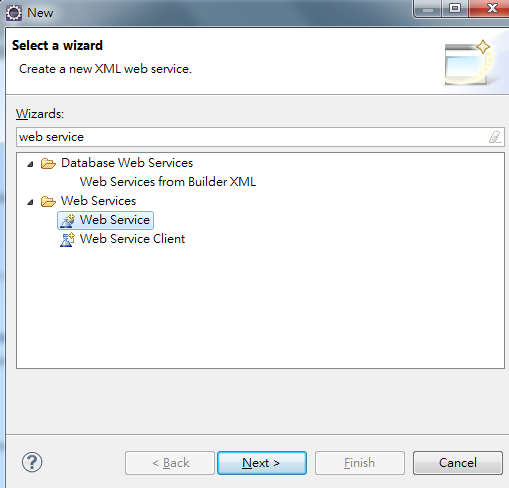
按 Ctrl + N => 選 Web Service => 下一步

... Configuration
Server Runtime: JBoss AS 7.1
Web Service Runtime: Axis2
Service Project: ExampleService
Service EAR project: ExampleEAR
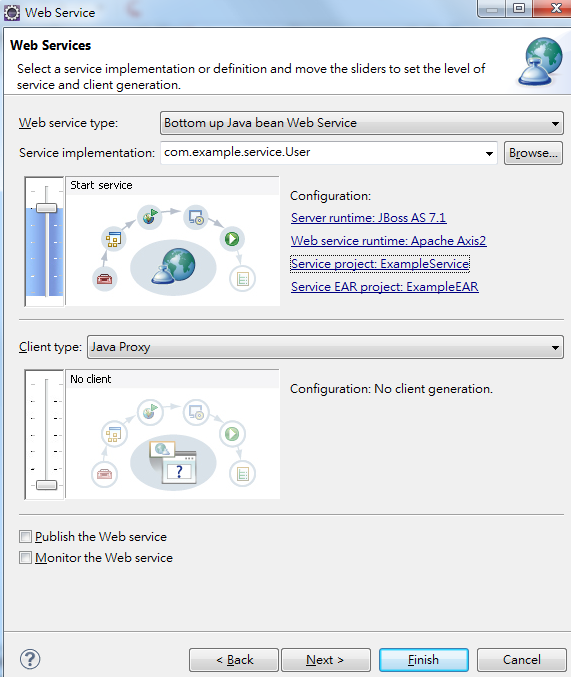

... Web Service Project 會包含 Axis2 的 Web Site

... 必需先加一個 Service (com.example.service.User)
之後可以再加

... 此專案可包含多個 service
所以我就命名ExampleService
底下再放其它的 ex: User, Order, ...

... EAR project 是必選 囧
就乾脆叫 ExampleEAR
到時連同 client 一起加進來部署

...next 後, 會產生必要的檔案
再選擇你自己的 services.xml 或 讓他自動產生, 結果


... services.xml 預設內容
有自動設定 mapping 到 com.example.service.User
但沒產生那個class... XD
<service name="User" >
 <Description>
  Please Type your service description here
 </Description>
 <messageReceivers>
  <messageReceiver mep="http://www.w3.org/2004/08/wsdl/in-only" class="org.apache.axis2.rpc.receivers.RPCInOnlyMessageReceiver" />
  <messageReceiver  mep="http://www.w3.org/2004/08/wsdl/in-out"  class="org.apache.axis2.rpc.receivers.RPCMessageReceiver"/>
 </messageReceivers>
 <parameter name="ServiceClass" locked="false">com.example.service.User</parameter>
</service>

---建立Service---
自己新增 com.example.service.User class
package com.example.service;
public class User {
 public String sayHello(String name) {
  return "Hello, " + name;
 }
}
在 services.xml 裡加入 operation (位置: ./service/opertaion )
<operation name="sayHello"></operation>

... 完成!!! 啟動Server (Create Proejct 時 產生的)


...連接到 http://localhost:8080/ExampleService/
可以看到 axis2 的管理介面
點 Services => User 可以看到你的 wsdl

.. 建立 Web Service Client
---Create Project---
... Ctrl + N => 建立 Web Service Client

... 在 Service definition 貼上你的 wsdl 路徑
ex: http://localhost:8080/ExampleService/services/User?wsdl

... Configuration
Server Runtime: JBoss AS 7.1
Web Service Runtime: Axis2
Service Project: ExampleWeb
Service EAR project: ExampleEAR


... 其它 - 預設

... 會產生 UserCallbackHandler.java 和 UserStub.java

注意!! 這似乎是用到舊版的產生器
所以, 咱們不要它,


---產生Stub(Skeletion)---
在build.xml(ant)中 加入
<target name="wsdl2java">
    <path id="axis2.jars">
        <fileset dir="D:/ProgramData/axis2-1.6.1/lib/">
            <include name="**/*.jar"/>
        </fileset>
    </path>
    <taskdef name="axis2-wsdl2java" classname="org.apache.axis2.tool.ant.AntCodegenTask">
     <classpath refid="axis2.jars"/>
    </taskdef>
    <axis2-wsdl2java wsdlfilename="http://localhost:8080/ExampleService/services/User?wsdl" output="./" skipbuildxml="true" />
</target>
然後對 build.xml 點右鍵 => Run As => Ant Build...
=> 勾選 wsdl2java => Run
這會再產生 Handler 和 Stub

或參考其它wsdl2java 產生方法


---使用Service---
UserStub stub = new UserStub();
UserStub.SayHello svcReq = new UserStub.SayHello();
svcReq.setName("my friend.");
UserStub.SayHelloResponse svcRes = stub.sayHello(svcReq);
response.getOutputStream().print(svcRes.get_return());

B.R. :)

Note
1. Axis2 1.6.1 的 eclipse 的 plugin tool 有問題, 請載前一版, 或下一版(1.7)
2. 發佈據說要在環境變數中加入 JAVA_HOME, AXIS2_HOME, JBOSS_HOME
3. 若要再加 Service, 先新增一個class, 並在 .java 檔上點右鍵 => Web Services => Create Web Service