網頁

2010年7月26日 星期一

iPhone-Cocos2d CCSprite Custom Touch Event

CCSprite 自定義觸控事件
Last Update: 2010/07/26 22:31


簡介


我們常用的那個 HelloWorldScene, 是繼承 CCLayer
它是可以註冊觸控事件 (ccTouchBegan...)
如果 CCSprite 本身有自動執行的行為, 並非與場景的互動
或是為了從場景獨立出來, or anything...
同樣的可以為 CCSprite 註冊


前置


環境:
XCode 3.2
Simulator 3.1.3
Cocos2d 0.99.4

準備工作:None

這裡有<主要的程式檔>可以載, 也可依下步驟完成


實作


  • 繼承CCSprite

  • 新增一個類別來繼承CCSprite
    咱們要覆寫 onEnter 及 onExit 來註冊和取消觸控事件
    因此咱們的 h 檔像這樣

    @interface MySprite : CCSprite < CCTargetedTouchDelegate > {
    CCLabel *label;
    }
    @property (nonatomic, retain) CCLabel *label;
    @end

    這裡的 label 是在觸控事件發生時顯示文字給我們看
    CCTargetedTouchDelegate 是實作觸控事件的協定


  • 註冊/取消觸控事件

  • 我們來到 mm檔

    - (void)onEnter{
    [[CCTouchDispatcher sharedDispatcher] addTargetedDelegate:self priority:1 swallowsTouches:NO];
    [super onEnter];
    }

    - (void)onExit{
    [[CCTouchDispatcher sharedDispatcher] removeDelegate:self];
    [super onExit];
    }

    注意下 swallowsTouches:no 以及 priority:1
    如果你把優先權設的比場景所屬的觸控事件還高
    又把 swallowsTouches 設成 Yes
    那你的 CCSprite 就會把觸控事件偷偷吃掉, 不告訴你的場景


  • 觸控事件

  • 還是在同一個 mm檔

    - (CGRect)rect{
    CGSize s = [self boundingBox].size;
    return CGRectMake(-s.width / 2, -s.height / 2, s.width, s.height);
    }
    - (BOOL)containsTouchLocation:(UITouch *)touch{
    return CGRectContainsPoint(self.rect, [self convertTouchToNodeSpaceAR:touch]);
    }

    上列程式, 這是為了判定是否點擊到的函式


    - (BOOL)ccTouchBegan:(UITouch *)touch withEvent:(UIEvent *)event{
    if([self containsTouchLocation : touch]){
    [self->label setString:@"Dont touch me"];
    }
    return YES;
    }
    - (void)ccTouchEnded:(UITouch *)touch withEvent:(UIEvent *)event{
    if([self containsTouchLocation : touch]){
    [self->label setString:@" "];
    }
    }

    這就是我們實作觸控事件的地方


  • 加入場景

  • 在我們最常用的 HelloWorldScene 裡 init 函式 的 if 區段
    用下述代碼覆寫

    CCLabel* label = [CCLabel labelWithString:@"Hello World" fontName:@"Marker Felt" fontSize:64];
    CGSize size = [[CCDirector sharedDirector] winSize];
    label.position = ccp( size.width /2 , size.height/2 + 100);
    [self addChild: label];


    MySprite *sprite = [MySprite spriteWithFile:@"img.png"];
    sprite.label = label;
    sprite.position = ccp(size.width/2, 100);
    [self addChild:sprite];

    只是在原本的Hello World
    加入 已繼承 CCSprite 的 MySprite
    記得把你的圖檔放進專案裡, 順便調整一下位置
    還有引入 MySprite.h 標頭檔

    The End...

    2010年7月25日 星期日

    Cocoa-libxml2 print xmlDocPtr

    印出 xmlDocPtr 指向的文件內容
    Last Update: 2010/07/26 11:16


    xmlChar *buffer = NULL;
    int size = 0;
    xmlDocDumpMemoryEnc(yourXmlDocPtr, &buffer, &size, "utf-8");
    
    NSLog(@"Xml Data: %@", [NSString stringWithCString:(char*)buffer encoding:NSUTF8StringEncoding]);
    
    free(buffer);
    buffer = NULL;
    

    2010年7月21日 星期三

    Cocoa-Other

    NSString

    NSString 2 char
    const char* cString = [nsStringObj cStringUsingEncoding:ASCIIEncoding];
    [nsStringObj UTF8String];


    char 2 NSString by encoding
    [NSString stringWithCString:temp encoding:NSUTF8StringEncoding];


    Join string array to single string
    NSArray * stuff = /* ... */;
    NSString * combinedStuff = [stuff componentsJoinedByString:@"separator"];
    and inverse by [NSString componentsSeparatedByString:]


    =========================================

    exist file
    BOOL fileExists = [[NSFileManager defaultManager] fileExistsAtPath:somePath];


    =========================================

    是否有相交
    CGRectIntersection


    =========================================

    亂數
    srand(time(NULL));random();
    arc4random


    =========================================

    typeof
    if(typeof([ErrorIDQuestion alloc])==typeof(question))
    f( [[myObject className] isEqual: @"NSString"])

    Cocoa-libxml2 install

    Cocoa-libxml2安裝
    Last Update: 2010/07/22 14:56


    實作


  • Step1. 加入Framework


  • 在專案的Framework目錄按右鍵 -> Add -> Existing Frameworks...


    找到 libxml2. -> Add


  • Step2. 引入標頭檔


  • 專案右鍵 ﹣>GetInfo -> Build頁籤
    在 Header Search Paths 或 User Header Search Paths 添加 /usr/include/libxml2
    Cocos2d 的 Box2d 似乎只能加在 User Header Search Paths, 不知為何 !?


    參考


    http://welcome.totheinter.net/2008/03/11/adding-the-libxml-framework-to-your-iphone-app/

    2010年7月19日 星期一

    Cocoa-Invoking function

    Cocoa-調用函式
    Last Update: 2010/07/19 16:35


    使用NSObject 的 performSelector 來調用函式
    SEL 是一個指標結構,用來儲存函式指標


    typedef struct {
    int code;
    NSString *message;
    }PassingData;
    
    - (void)invokedMethod : (id)sender : (PassingData*)msg{
    NSLog(@"%d : %@", msg->code, msg->message);
    }
    
    - (void)execInvoke : (id)sender : (SEL)method{
    PassingData *pd = malloc(sizeof(PassingData));
    pd->code = 3;
    pd->message = @"QWERT";
    [sender performSelector:method withObject:sender withObject:(id)pd];
    free(pd);
    }
    
    - (void)applicationDidFinishLaunching:(NSNotification *)aNotification {
    // Insert code here to initialize your application 
    [self execInvoke:self :@selector(invokedMethod::)];
    }


    2010年7月14日 星期三

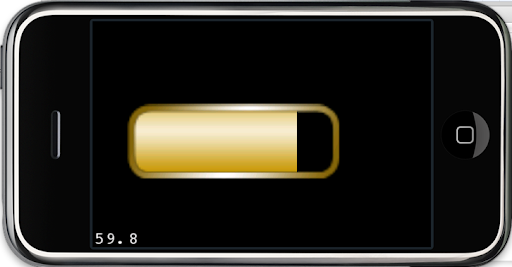
    iPhone-Cocos2d Progress/Health Bar

    iPhone - Cocos2d 進度 / 血量 條
    Last Update: 2010/07/14 21:18


    前置


    環境:
    XCode 3.2.2
    Compile: Simulator 3.1.3-Debug
    iPhone SDK 4.0
    Cocos2d 0.99.4

    準備工作:
    外框及內部圖片


    實作


    新增Cocos2d專案以後
    將圖片加入Resource

    我們將用 CCProgressTimer 來做進度 / 血量 條
    把下列程式覆寫在 init 函式裡的 if 區段


    CCSprite *spriteBorder = [CCSprite spriteWithFile:@"hp_border.png"];
    spriteBorder.position = ccp(150,150);
    [self addChild:spriteBorder];

    先放個外框


    CCProgressTimer *spriteBar = [CCProgressTimer progressWithFile:@"hp_bar.png"];
    spriteBar.type = kCCProgressTimerTypeHorizontalBarLR;
    [spriteBorder addChild:spriteBar];
    [spriteBar setAnchorPoint:ccp(0,0)];

    .type 選擇水平從左到右
    將 Bar 加入外框的子節點
    並將它 "Anchor" 在(0, 0)的位置
    這樣省了計算外框和 Bar 的關係位置


    spriteBar.percentage = 80;
    CCAction *action = [CCProgressTo actionWithDuration:1 percent:1];
    [spriteBar runAction:action];

    2 種方式變更計量
    直接設定 以及 CCProgressTo (action)


    iPhone-Cocos2d Animation Frame 2

    iPhone-Cocos2d 動畫 (連續圖片播放) part.2
    Last Update: 2010/07/14 20:43

    前置


    環境:
    XCode 3.2.2
    Cocos2d 0.99.4

    準備工作:
    連續圖片


    步驟


    新增Cocos2d專案
    將圖片直接加入Resource
    將 init 函式裡的 Code 用下列程式碼代換
    滿淺顯易懂的, 就不說明了


    if( (self=[super init] )) {


    CCSprite *mySprite = [[CCSprite alloc] initWithFile:@"fox_0001.png"];
    CCSprite *mySprite2 = [[CCSprite alloc] initWithFile:@"fox_0001.png"];


    CCAnimation *walk = [[CCAnimation alloc] initWithName:@"walk" delay:0.1];
    for(int i=1;i<=10;i++){
    [walk addFrameWithFilename:[NSString stringWithFormat:@"fox_%04d.png", i]];
    }


    [mySprite addAnimation:walk];
    [mySprite2 addAnimation:walk];

    //[mySprite setDisplayFrame:@"walk" index:0];
    //[mySprite setDisplayFrame:@"walk" index:1];

    CCAction *action = [CCRepeatForever actionWithAction:[CCAnimate actionWithAnimation:walk restoreOriginalFrame:NO]];
    CCAction *action2 = [CCAnimate actionWithAnimation:walk restoreOriginalFrame:NO];
    [mySprite runAction:action];
    [mySprite2 runAction:action2];


    mySprite.position = ccp(150,150);
    mySprite2.position = ccp(300,150);

    [self addChild:mySprite];
    [self addChild:mySprite2];
    }
    return self;


    2010年7月6日 星期二

    iPhone-Cocos2d Other

    雜項 其它 未整理


    向量:
    ccpLength
    ccpLengSQ
    ccpDistance
    ccSub


    Call function
    CCCallFuncND eventFunc = [CCCallFuncND
    actionWithTarget:self
    selector:@selector(gotoGameScene:data:)
    data:role];
    [eventFunc execute];


    CCSequence, dynamically add action

    +(CCFiniteTimeAction *) getActionSequence: (NSArray *) actions
    {
    CCFiniteTimeAction *seq = nil;
    for (CCFiniteTimeAction *anAction in actions)
    {
    if (!seq){
    seq = anAction;
    }else{
    seq = [CCSequence actionOne:seq two:anAction];
    }
    }
    return seq;
    }


    自定義資料
    CCNode.tag
    CCNode.userData