網頁

2012年3月31日 星期六

Web Service - Axis2

Last Update: 2012/04/01 07:28+08
Type: Normal

Intro

target 是在 用 Axis2 建立 Web Service 及其 Client


環境:
jdk-1.7.0.3
Axis2-1.6.1
eclipse-jee-indigo-SR2-win32
JBoss 7.1 (not important, you can use tomcat)

P.S. 若用 JBoss 7.1
downlaod 官網的 JBoss Server 後
請先用 eclipse market 找 JBoss 然後安裝適合你的(eclipse)版本
不然會找不到 7.1 的 Server


Content


.. 安裝必要 Component
(路徑自選)
安裝 jdk 到 C:\Program Files\Java\jdk1.7.0_03
解壓縮 eclipse, JBoss and Axi2 到 D:\ProgramData
啟動eclipse~

.. 安裝JBoss plugin 用以支援6.0以上
(選單)Help => Eclipse Marketplace => 搜尋 JBoss 並安裝

咱的eclipse版本是 Indigo(3.7), 所以 JBoss plugin tool 是 3.3
在 Marketplace 選擇有標記 Indigo 的

JBoss 官網 Download


.. 設定執行環境 - JDK
(選單) Window => Preferences => Java => Complier => Compiler compliiance leve: 1.7(自選)

(選單) Window => Preferences => Java => Installed JREs => 新增JDK 1.7 (自選- C:\Program Files\Java\jdk1.7.0_01)

.. 設定執行環境 - JBoss
(選單) Window => Preferences => Sreve => Runtime Environments
=> 新增 JBoss 7.1 (自選- D:\ProgramData\jboss-as-7.1.1.Final)

.. 設定執行環境 - Axis2
(選單) Window => Preferences => Web Services => Axis2 Preferences
=> 在 [Axis2 runtime location] 設定 Axis2 路徑(自選- D:\ProgramData\axis2-1.6.1)

.. 建立 Web Service
---Create Project---
按 Ctrl + N => 選 Web Service => 下一步


... Configuration
Server Runtime: JBoss AS 7.1
Web Service Runtime: Axis2
Service Project: ExampleService
Service EAR project: ExampleEAR


... Web Service Project 會包含 Axis2 的 Web Site

... 必需先加一個 Service (com.example.service.User)
之後可以再加

... 此專案可包含多個 service
所以我就命名ExampleService
底下再放其它的 ex: User, Order, ...

... EAR project 是必選 囧
就乾脆叫 ExampleEAR
到時連同 client 一起加進來部署

...next 後, 會產生必要的檔案
再選擇你自己的 services.xml 或 讓他自動產生, 結果


... services.xml 預設內容
有自動設定 mapping 到 com.example.service.User
但沒產生那個class... XD
<service name="User" >
 <Description>
  Please Type your service description here
 </Description>
 <messageReceivers>
  <messageReceiver mep="http://www.w3.org/2004/08/wsdl/in-only" class="org.apache.axis2.rpc.receivers.RPCInOnlyMessageReceiver" />
  <messageReceiver  mep="http://www.w3.org/2004/08/wsdl/in-out"  class="org.apache.axis2.rpc.receivers.RPCMessageReceiver"/>
 </messageReceivers>
 <parameter name="ServiceClass" locked="false">com.example.service.User</parameter>
</service>

---建立Service---
自己新增 com.example.service.User class
package com.example.service;
public class User {
 public String sayHello(String name) {
  return "Hello, " + name;
 }
}
在 services.xml 裡加入 operation (位置: ./service/opertaion )
<operation name="sayHello"></operation>

... 完成!!! 啟動Server (Create Proejct 時 產生的)


...連接到 http://localhost:8080/ExampleService/
可以看到 axis2 的管理介面
點 Services => User 可以看到你的 wsdl

.. 建立 Web Service Client
---Create Project---
... Ctrl + N => 建立 Web Service Client

... 在 Service definition 貼上你的 wsdl 路徑
ex: http://localhost:8080/ExampleService/services/User?wsdl

... Configuration
Server Runtime: JBoss AS 7.1
Web Service Runtime: Axis2
Service Project: ExampleWeb
Service EAR project: ExampleEAR


... 其它 - 預設

... 會產生 UserCallbackHandler.java 和 UserStub.java

注意!! 這似乎是用到舊版的產生器
所以, 咱們不要它,


---產生Stub(Skeletion)---
在build.xml(ant)中 加入
<target name="wsdl2java">
    <path id="axis2.jars">
        <fileset dir="D:/ProgramData/axis2-1.6.1/lib/">
            <include name="**/*.jar"/>
        </fileset>
    </path>
    <taskdef name="axis2-wsdl2java" classname="org.apache.axis2.tool.ant.AntCodegenTask">
     <classpath refid="axis2.jars"/>
    </taskdef>
    <axis2-wsdl2java wsdlfilename="http://localhost:8080/ExampleService/services/User?wsdl" output="./" skipbuildxml="true" />
</target>
然後對 build.xml 點右鍵 => Run As => Ant Build...
=> 勾選 wsdl2java => Run
這會再產生 Handler 和 Stub

或參考其它wsdl2java 產生方法


---使用Service---
UserStub stub = new UserStub();
UserStub.SayHello svcReq = new UserStub.SayHello();
svcReq.setName("my friend.");
UserStub.SayHelloResponse svcRes = stub.sayHello(svcReq);
response.getOutputStream().print(svcRes.get_return());

B.R. :)

Note
1. Axis2 1.6.1 的 eclipse 的 plugin tool 有問題, 請載前一版, 或下一版(1.7)
2. 發佈據說要在環境變數中加入 JAVA_HOME, AXIS2_HOME, JBOSS_HOME
3. 若要再加 Service, 先新增一個class, 並在 .java 檔上點右鍵 => Web Services => Create Web Service
2011年12月8日 星期四

Gae Web Service (Java)

Last Update: 2011/12/09 13:33+08
Type: Note

Intro

這只是一篇學習筆記
若看倌們對這個標題有興趣
可參考最下面的 Reference~

根據官方文章說法, GAE 不支援使用JAX-WS, 因此要自己用 wsgen, wsimport 來實作 Web Service.

步驟
1. 建立 Web Application Project
2. 建立 WebMethod (Web Service API)
3. 使用 wsgen 產生所需檔案
4. 產生可執行的實例


XCode Other

Debug Console

print
(gdb) print (void)CFShow(myCFString)
(gdb) po (NSString*)myCFString

2011年11月27日 星期日

OpenXML Simple Sample

Last Update: 2011/11/28 01:18+08


Intro

今次去客戶那學到了些東西!
就是這次的 OpenXML
常常都有客戶會要匯出 Word Report
過去寫這個只有麻煩, 要不直接拒絕
時代在變遷呀~囧
在 Word 2007 以後, 文件的內裡其實是XML Document
為了方便Programmer操作, 也釋出了OpenXML SDK
下面來介紹一些基本的使用


---Prepare---
Word 2007 up (廢話 XD)
OpenXML SDK (lib, tool)


---Step---
1. 建立Template
  • 開啟 開發人員(Developer) 頁籤
  • 插入 內容控制項(Content Control)
  • 檢視Word の Xml Document
2. Coding


Content


1. 建立 Template
從頭到尾用 Code 寫 Word 未免太累了
所以咱們要先建立Template

後面有用到 內容控制項
主要是為了在撰寫Code時
可以方便尋找我們要的位置
所以這是非必要的~

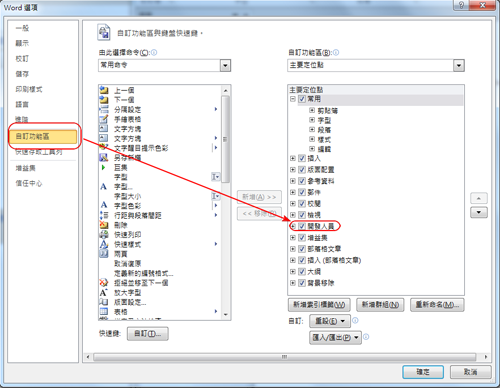
開啟 開發人員(Developer) 頁籤
為了在設計 Template 期間, 加入內容控制項
咱們需要先把開發人員的功能開啟來
檔案 => 選項 => 自訂功能區 => 勾選 開發人員


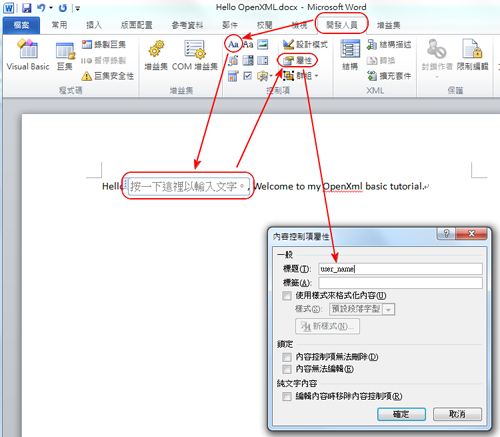
插入 內容控制項(Content Control)
如下圖所示
移到開發人員頁籤後, 點擊您想用的內容控制項, 就完成加入的動作了.
為了待會方便搜尋, 咱們 再來點選屬性, 輸入控制項別名(alias)
醬~ 咱們的Template就算完成了


檢視Word の Xml Document
請把Word的衣服脫了!!!
喔不, 請直接對Word點右鍵, 解壓縮!!!
如果沒這個選項, 就請先把副檔名改成 ".zip"
您會看到它的檔案結構
請開啟 word/document.xml

您可以稍微看一下內容
但其實不用太瞭解結構
之後用Code操作, 只要針對Template的長相去寫Code就好了
這邊就不廢話, 反正寫了就會瞭解


2. Coding
首先就是加入參考啦
如果沒有安裝Tool的
請到 OpenXML 安裝目錄下找 DLL 引入
有安裝的直接按加入參考選 DocumentFormat.OpenXml
另外是有可能會叫你加入 WindowsBase.dll 的參考, 就照做唄

再來就是Code
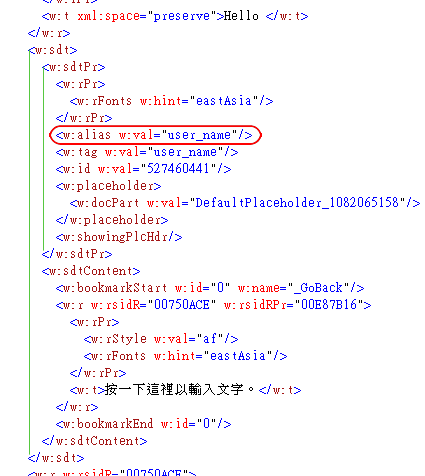
寫Code前先看一下 Word 的 Xml Document


咱們的 <w:alias ... /> 的上一層是 <w:sdtPr>
應該是Parameter的意思
同層的 <w:sdtContent> 底下的 <w:t>, 就是咱們要的
所以可以醬寫~
using (var wdDoc = DocumentFormat.OpenXml.Packaging.WordprocessingDocument.Open("HelloOpenXML.docx", true)){
    //因為是Template, 所以不會為null
    var doc = wdDoc.MainDocumentPart.Document;
    //尋找所有別名(alias)
    var alias = doc.Descendants<DocumentFormat.OpenXml.Wordprocessing.SdtAlias>();
    foreach (var loop in alias){
        switch (loop.Val.Value){
            case "user_name"://若是 user_name
                //取得文字物件
                var text = loop.Parent.Parent
                    .Descendants<DocumentFormat.OpenXml.Wordprocessing.Text>()
                    .FirstOrDefault();
                //取代原文字
                text.Text = "Your Name";
                break;
        }
    }
}

The End...


Reference

Creating Content Controls

2011年9月23日 星期五

dotNet Dynamic Compile Code

Last Update: 2011/09/23 16:51+08

Intro

動態編譯程式碼!!
並不是動態產生程式碼!!
目的請各位看倌自行應用
小弟是讓使用者可以自己輸入折扣/特價

底下會分幾段
1. Dynamic Compile Code
  a. Compiler Parameters
  b. Code
  c. Compile
  d. Run
2. Sample Code


Content


1. Dynamic Compile Code
底下為動態 Compile Code 並執行的方法
一開始要創建 Code Provider, 用來Compile
static object RunCode(string code){
    var provider = Microsoft.CSharp.CSharpCodeProvider.CreateProvider("C#");

    /*---Compiler Parameters---*/
    var compilerParams = new System.CodeDom.Compiler.CompilerParameters();
    compilerParams.ReferencedAssemblies.Add("System.dll");
    compilerParams.GenerateExecutable = false;
    compilerParams.GenerateInMemory = false;


    /*---Code---*/
    System.Text.StringBuilder fileCode = new StringBuilder();
    fileCode.Append("using System; \n")
        .Append("public class TestDynCode{")
            .Append("public object Run(){")
                .Append(code)
            .Append("}")
        .Append("}");


    /*---Compile---*/
    var compilerResult = provider.CompileAssemblyFromSource(compilerParams, fileCode.ToString());
    if (compilerResult.Errors.HasErrors){
        System.Text.StringBuilder error = new StringBuilder();
        foreach (System.CodeDom.Compiler.CompilerError err in compilerResult.Errors)
        { error.AppendFormat("{0}\n", err.ErrorText); }
        throw new Exception("Error Compiling Expression: " + error.ToString());
    }

    /*---Run---*/
    System.Reflection.Assembly assembly = compilerResult.CompiledAssembly;
    var obj = assembly.CreateInstance("TestDynCode");
    return obj.GetType().GetMethod("Run").Invoke(obj, null);
}

大致可以分為 4 段
跟我們平常開發的方式差不多

a. Compiler Parameters
先設置參數, 包含要加入參考的 Lib
和 Compile 環境等等參數

b. Code
開始寫Code, 內容跟平常寫Code一樣, 只是變成字串
這邊為了方便, 已經寫好 class 和 method 名稱
使用時, 只要傳來裡面的 Code

c. Compile
Compile (Build)
寫好Code當然就直接Compile看看能不能過了
可以從 compilerResult 這物件去取得 Compile Error

d. Run
取得它Compile好的Assembly
創建物件實體, 最後 Invoke Method

動態編譯Code大概就醬


2. Sample Code
這裡稍微寫一小段測試的Code
GetTotalPrice: 給價格 和 數量 算總價, 裡頭暫時寫死了計算規則
Main: 呼叫 GetTotalPrice 列出結果
static void Main(string[] args){
    Console.WriteLine(GetTotalPrice(10, 9));
    Console.WriteLine(GetTotalPrice(10, 4));
    Console.ReadKey();
}

static object GetTotalPrice(decimal price, int count){
    string inputRule = "return [數量] > 5 ? [價格] * [數量] * 0.9 : [價格] * [數量];";//賣方Input

 //實際要Run的Code
    string realInputRule = inputRule
        .Replace("[數量]", count.ToString())
        .Replace("[價格]", price.ToString());
    return RunCode(realInputRule);
}

感謝各位看倌賞臉~